In Microsoft Word, typeface is referred to as font. A typeface is a set of characters with common design and shape. MS Word allows you to use a variety of fonts and change their size, style and colour.
In this tutorial, you will learn how to change font of the text in a document and also to change the size and colour of the font.
Task
Open the “Exam Schedule” document that you had created and saved earlier in MS Word 2007 or download the file "Exam Schedule" from the About Tutorials page and open it in MS Word 2007. In the first line, change the font of the text to ‘Cooper Black’, choose Regular style, increase font size to 20 pt and change font colour to Dark Red.
Step-by-Step Instructions
Method-1: Using Ribbon
You could also change the font size using the Grow Font & Shrink Font buttons (see Figure 1) in the Ribbon.
Method-3: Using Mini Toolbar
Recap
In this tutorial, you will learn how to change font of the text in a document and also to change the size and colour of the font.
Task
Open the “Exam Schedule” document that you had created and saved earlier in MS Word 2007 or download the file "Exam Schedule" from the About Tutorials page and open it in MS Word 2007. In the first line, change the font of the text to ‘Cooper Black’, choose Regular style, increase font size to 20 pt and change font colour to Dark Red.
Step-by-Step Instructions
Method-1: Using Ribbon
 |
| Figure 1:Font Buttons in Font Group of Home Tab |
 |
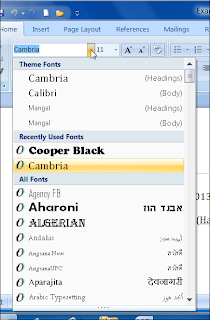
| Figure 2: Font Drop-down Menu |
- Select the first line of “Exam Schedule” document.
- Click the ‘Home’ tab on Ribbon (see Figure 1).
- To change the font, click the down pointing arrow-head in the Font box. A drop down menu of fonts will open (see Figure 2).
- Use the scroll bar of this menu to scroll down to Cooper Black font. You will notice that as the mouse pointer passes over a font name, MS Word provides a live preview of what the selected text will look like in that font.
- Click the Cooper Black font to select it. The first line will appear in Cooper Black font.
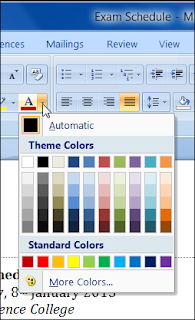
- To change the font colour, click the down arrow next to the ‘Font Colour’ button. MS Word will open a drop down colour pallette which offers several options for changing font colour (see Figure 3). You can choose one of the theme colours or standard colours. If you are still not satisfied, click ‘More Colours’ option and you will see the ‘Colours’ dialog which offers practically endless choice of font colours. You will see a live preview as in case of changing font and font size.
- Choose the desired ‘Dark Red’ colour from the ‘Standarad Colours’ display. The first line now appears in Dark Red font colour.
- To change the font size, click the down arrow next to the ‘Font Size’ field. A drop down list of font sizes opens (see Figure 4).
- Use the scroll bar of this menu to scroll down to 20 pt size. As before, live preview is available in the document itself.
- Click the 20 pt size. The first line now appears in 20 pt font size.

Figure 3: Font Colour Palette
You could also change the font size using the Grow Font & Shrink Font buttons (see Figure 1) in the Ribbon.
- Select the first line of “Exam Schedule” document.
- Click the ‘Home’ tab on Ribbon.
- Click the ‘Grow Font’ button. You will notice that the value in font size field has increased.
- Click the ‘Grow Font’ button successively until you see ‘20’ in the ‘Font Size’ field. The first line will now appear in 20 pt size.
Method-2: Using Font Dialog Box
- Select the first line of “Exam Schedule” document.
- Click ‘Home’ tab on the Ribbon.
- Click the ‘Font Dialog launcher’ (see Figure 1) to start the Font dialog box of MS Word (see Figure 5).
- Click the ‘Font’ tab, if it is not already selected.
- To change the font, click the down arrow-head next to the ‘Font' field in the Latin Text section and select Cooper Black font from the drop down menu. In this case, MS Word will show a preview of the font change in the ‘Preview’ section of the dialog box.

Figure 4: Font Size Drop-down List - To change the font size, click the down arrow-head next to the ‘Font Size’ field in the ‘Latin Text’ section and select size 20 from the drop down menu of font sizes. You will see live preview in the preview section of the dialog.
- To change font colour, click the down arrow next to the ‘Font Colour’ field in the ‘All Text’ section. You will see a drop down colour palette.
- Select the Dark Red colour from the Standard Colours palette. MS Word will show a live preview in the preview section of the dialog box.
- Click the ‘OK’ button. Font of the first line will change to Cooper Black, its size will become 20pt and the colour will change to Dark Red.
The Font dialog allows you to change the Font Style as well. MS Word offers four font styles – Regular, Bold, Italic and Bold Italic, the default style being Regular. Choose the Italic font style in the Font Style listbox and click 'OK' button. The entire selected text will appear in italic. For our exercise, however, we want to use Regular font style. Hence, launch the Font Dialog box again, choose 'Regular' style and click 'OK'. The text will return to the regular font style.
Method-3: Using Mini Toolbar
- Select the first line of “Exam Schedule” document.
- Place the mouse pointer over selected text. A faded image of Mini Toolbar will appear near the mouse pointer.
- Move the mouse pointer to the Mini Toolbar. The Mini Toolbar will become clearly visible (see Figure 6).
- To change the font, click the down arrow-head next to the Font field in the Mini Toolbar. A drop-down list of fonts will appear.
- Select Cooper Black font from the drop down menu.The first line will now appear in ‘Cooper Black’ font.
- To change font size, click the down arrow-head next to the Font Size field in the Mini Toolbar. The drop-down menu of font sizes will appear.
- Click the 20 font size. The first line will now appear in 20 pt size.
- To change font colour, click the down arrow-head next to the Font Colour button in the Mini Toolbar and select Dark Red from the Standard Colours palette. First line will now appear in Dark Red colour.
|
|
Recap
- Font, Font size and Font colour in MS Word 2007 documents can be manipulated with the help of Ribbon commands or Font Dialog or Mini Toolbar
- If you wish to specify font style, you should use the ‘Font’ dialog box. The style so selected will apply to the entire text of the document.
We appreciate you reading this guide in its entirety. Visit us again for news and useful advice in the future. It will be worthwhile for you to visit. I truly value your coming by and being here. If you find these instructions and advice useful and instructive, kindly tell your friends about our website. On the other hand, if you believe that there is any area that could use better, kindly share your suggestions. These will be much embraced and valued. Use the comment section below to provide suggestions or ask questions. Your questions will be swiftly investigated and properly addressed, and your comments will be promptly examined and published. Thanks.


(flattened).png)

