You must have noticed that books and magazines are printed in a variety of sizes. Hence, different sizes of paper are required to suit the requirement of printing. Microsoft Word allows users to choose a variety of paper sizes for their documents. The default paper size is US Letter (8.5”x11”) or A4 (8.27”x11.69”) but MS Word offers a large menu of standard paper sizes to choose from and also allows setting of a custom paper size of your own.
Paper on which text is printed could have two orientations – portrait and landscape. In portrait orientation, height of the paper is larger than its width whereas in landscape orientation, the width is larger than the height.
In this tutorial, you will learn how to set paper size and paper orientation in a MS Word document.
Task-1: Changing Paper Size
Download the practice document “Alice’s Adventures in Wonderland” from About Tutorials page and do the following:
Step-by-step Instructions
Download the practice document “Alice’s Adventures in Wonderland” and open it.
Changing Paper Size
Setting a Custom Paper Size
Changing Paper Size of a Part of the Document
Task-2: Setting Paper Orientation
Change the orientation of the document to landscape.
Step-by-step Instructions
Recap
In MS Word documents:
Paper on which text is printed could have two orientations – portrait and landscape. In portrait orientation, height of the paper is larger than its width whereas in landscape orientation, the width is larger than the height.
In this tutorial, you will learn how to set paper size and paper orientation in a MS Word document.
Task-1: Changing Paper Size
Download the practice document “Alice’s Adventures in Wonderland” from About Tutorials page and do the following:
- Change its paper size to Legal (8.5” x 14”).
- Further, change the paper size to 7”x8”.
- Finally, change the paper size of page 2 onwards to A4 size (8.27”x11.69”).
Step-by-step Instructions
Download the practice document “Alice’s Adventures in Wonderland” and open it.
Changing Paper Size
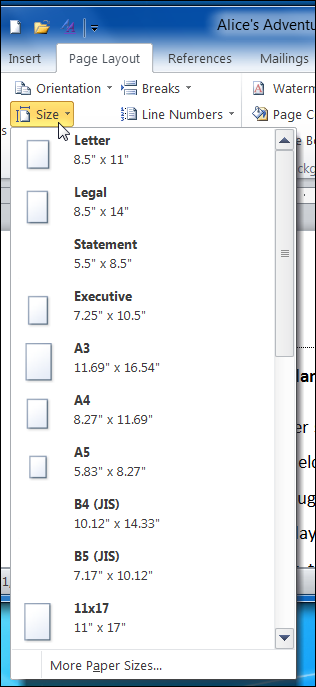 |
| Figure 1: Paper Size Drop-down Menu |
- Click the ‘View’ tab and then click ‘One Page’ button in the ‘Zoom’ group. The entire page will become visible on the screen. This step is not necessary for changing the paper size; it is just meant to show you visually the change in size of the document when you specify a different paper size.
- Click the ‘Page Layout’ tab on the Ribbon.
- Click the ‘Size’ button in ‘Page Setup’ group. A drop-down gallery of paper sizes will open with a scroll bar on its right side (see Figure 1). View all the paper sizes available using the scroll bar.
- Choose ‘Legal’ size from the gallery. MS Word will change the size of paper to 8.5”x14”. You will notice the change in paper size on computer screen.
Setting a Custom Paper Size
- Click the ‘Size’ button on the ‘Page Layout’ tab and scroll through the Paper Size gallery to see if a 7”x8” paper size is available. You will find that such a paper size is not included in the gallery.
- Click ‘More Paper Sizes’ at the bottom of the gallery. The ‘Page Setup’ dialog box will open with the ‘Paper’ tab open (see Figure 2).
- In the ‘Paper Size’ section, enter “7” in ‘Width’ box and “8” in “Height’ box. MS Word will show a preview of the specified paper size in the ‘Preview’ section of the dialog box.
- Click ‘OK’ button to close the dialog box. You will see that the size of the document has changed to 7”x8”.
 |
| Figure 2: Page Setup Dialog Box |
- Scroll to page 2 and place the cursor at the beginning of the first line.
- Click the ‘Page Setup Dialog Box Launcher’, which is a down pointing arrow in the bottom right corner of the ‘Page Setup’ group on “Page Layout’ tab (see Figure 3). The ‘Page Setup Dialog Box’ will open with the ‘Paper’ tab selected (see Figure 4).
- Click the down pointing arrowhead at the right of the top box in ‘Paper Size’ section. A drop down menu of paper sizes will be displayed.
- Scroll down to A4 size and click it. The ‘Width’ box will show “8.27” and the ‘Height’ box will show 11.69”. MS Word will show a preview of the paper size selected in the ‘Preview’ section of dialog box.
- Click the down pointing arrowhead at the right side of ‘Apply To’ box. You will see two options – ‘Whole document’ and ‘This point forward’. Choose the second option.
- Click ‘OK’ button to close the dialog box. You will find that the 7”x8” paper size has been retained in page 1 whereas the size of paper from second page onwards has changed to A4.
 |
| Figure 3: Page Layout Tab |
Task-2: Setting Paper Orientation
Change the orientation of the document to landscape.
Step-by-step Instructions
- Click the ‘Page Layout’ tab on the Ribbon.
- Click the ‘Orientation’ button in the ‘Page Setup’ group. A drop-down menu will open showing two options – Portrait and Landscape.
- Choose ‘Landscape’. The orientation of the document will change to landscape.
In MS Word documents:
- To change the paper size, click the ‘Size’ button on in ‘Page Setup’ group of ‘Page layout’ tab and select the desired paper size.
- To set custom paper size, open the ‘Page Setup Dialog Box’ and enter the desired values in the ‘Width’ and ‘height’ boxes.
- To apply a different paper size from the current page onwards, choose ‘This point forward’ option in the ‘Apply to’ drop down menu in ‘Page Setup Dialog Box’.
- To change page orientation, click the ‘Orientation’ button on ‘Page layout’ tab and select the desired orientation.
We appreciate you reading this guide in its entirety. Visit us again for news and useful advice in the future. It will be worthwhile for you to visit. I truly value your coming by and being here. If you find these instructions and advice useful and instructive, kindly tell your friends about our website. On the other hand, if you believe that there is any area that could use better, kindly share your suggestions. These will be much embraced and valued. Use the comment section below to provide suggestions or ask questions. Your questions will be swiftly investigated and properly addressed, and your comments will be promptly examined and published. Thanks.

(flattened).png "MS WORD 2010 INTERFACE")


