We all use Microsoft Word in our daily life – for writing letters to friends and relatives, making resume for a job, writing an article for a journal, doing an assignment given by the teacher – the list is endless. Even though MS Word plays such an important role in enabling us to do such routine, but essential, things every day, I have found that few Word users devote time to learn even the very basic features of this wonderfully powerful software. The result is they pick up poor paragraph and page formatting habits or use unduly long-winded procedures for doing things for which MS Word has specific commands that produce the same result more efficiently.
In this series, I am going to describe some common mistakes that I have noticed in the documents created by not only beginners but even experienced MS Word users. I will also tell you how to avoid them, and after you finish reading the step-by-step instructions, I am sure you will say – boy, was that easy!
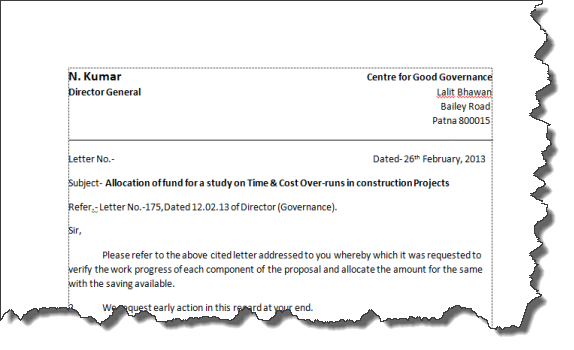
Text Alignment in LetterheadThe other day my assistant emailed me the draft of a letter for my approval. It looked like this (Figure 1):
 |
| Figure 1 |
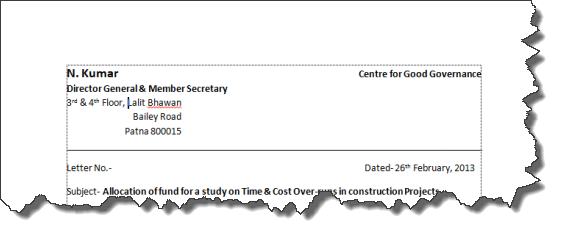
I found that my designation was not correctly mentioned in the head of the letter – he had typed the designation as “Director General” whereas it should have been “Director General & Member Secretary”. Also, he had forgotten to mention “3rd & 4th Floor” before “Lalit Bhawan” in the address. So, I added “& Member Secretary” after “Director General”, and see what happened (Figure 2):
 |
| Figure 2 |
The draft got further jumbled when I inserted “3rd & 4th Floor” before “Lalit Bhawan” (Figure 3):
 |
| Figure 3 |
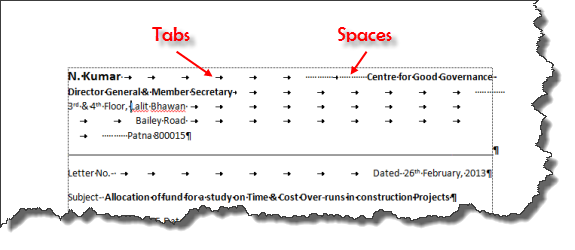
To ascertain the problem, I clicked the ‘Show/Hide’ button on ‘Home’ tab and what I found was revealing. My assistant had used tabs (represented by arrows) and spaces (represented by dots) to align address text in the letter head with the right margin and the Enter key was used only after the last address line (see Figure 4). So, MS Word regarded the name, designation and address as part of the same paragraph, and when I tried to insert additional text in the second line after designation and before “Lalit Bhawan”, the text wrapping feature of MS Word pushed the address text at the right end of the line to the next line.
 |
| Figure 4 |
The method used to align address text to the right and the name and designation text to the left was not correct. There are two ways of aligning text in the letterhead and these are explained below.
Method-1: Aligning Text Using TabsIn a letterhead, name and designation text is to be left aligned while the address text is to be right aligned in each line. This can be achieved using the Tabs as explained below.
 |
| Figure 5 |
- Start a new document and type the name “Navin Kumar” in the first line. As the paragraph text is left aligned by default, the name text will appear on the computer screen aligned with the left margin.
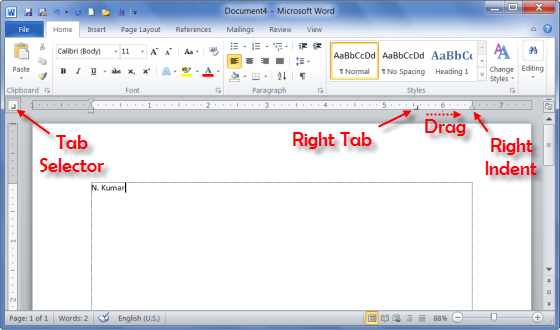
- Click the ‘Tab Selector’ successively until the ‘Right Tab’ appears on it.
- Next click somewhere near the right end of the horizontal ruler. The right tab marker will appear on the ruler (see Figure 5).
- Drag the tab marker and drop it on the ‘Right Indent’ marker on the ruler.
- Press Tab key. The cursor will jump to the right margin.
- Now type the address text “Centre for Good Governance”. You will see that the letters appear at the right margin and move towards the left.
- Press Enter key on your computer. The cursor will move to the beginning of the second line.
- Type the designation text. It will appear just below the name text.
- Press Tab key to move cursor to the right margin, type the address text and press Enter key. Cursor will move to the third line.
- In the third line, only address text is to be typed. So, press Tab key, type the address text and press the Enter key. Cursor will move to the fourth line.
- Repeat the previous step for the fourth line also and you are done.
The advantage of this method is that even when you edit or add text in any line, the text will remain confined to that line only. Also name/ designation text will remain left aligned and the address text right aligned. If you press the ‘Show/Hide’ button on ‘Home’ tab, the hidden formatting symbols will become visible and the letterhead will look like figure 6.
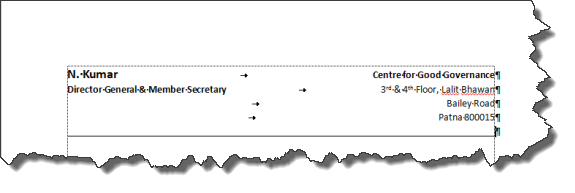 |
| Figure 6 |
Method-2: Using Table Feature of MS Word to Make Letterhead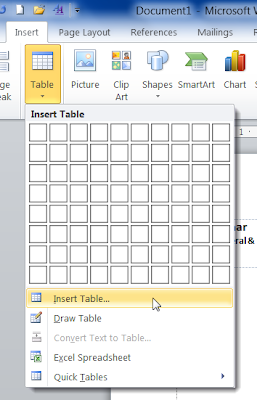 |
| Figure 7 |
- Start a new document and click on the ‘Insert’ tab.
- Click the ‘Table’ button. The ‘Insert Table’ menu will open (see Figure 7).
- Click the ‘Insert Table’ option. The ‘Insert Table’ dialog box will be launched (see Figure 8).
- Fill “2” in ‘No of columns’ box and “1” in ‘No of rows’ box.
- Click ‘OK’. A single row table with two cells will appear (see Figure 9)
- Place cursor in the left cell and type “Navin Kumar”.
- Press Enter key and type the designation.
- Place cursor in the right cell.
- Click ‘Home’ tab on the Ribbon.
- Click ‘Align Text Right’ button in the ‘Paragraph’ group. The cursor will jump to the right end of the cell.
- Type the first line of address. The letters will appear at the cursor at the right end of the cell and move left.
- After you have typed the last letter of the address text, press the Enter key. The cursor will descend to the second line but will remain right aligned in the cell.
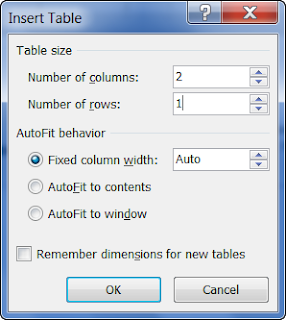 |
| Figure 8 |
- Repeat the previous two steps for each line of address text.
- Hover the mouse pointer over the table. A tiny square with four headed arrow will appear above the top left corner of the table. This is the Table Selector (see Figure 10).
- Move the pointer to the Table Selector and click it. The entire table will get highlighted and the Mini Toolbar will appear.
- Click the ‘Borders’ button on the Mini Toolbar. A drop down list of borders will appear.
- Select the ‘No Border’ option. The border around the letterhead will disappear.
Your letterhead is now ready (see Figure 11). In this method, the left aligned text (Name/ designation) has been placed in the left cell and the address text which is to be right aligned has been separated and placed in the right cell. Hence their texts will never get mixed up with each other.
 |
| Figure 9 |
 |
| Figure 10 |
 |
Figure 11
We appreciate you reading this guide in its entirety. Visit us again for news and useful advice in the future. It will be worthwhile for you to visit. I truly value your coming by and being here. If you find these instructions and advice useful and instructive, kindly tell your friends about our website. On the other hand, if you believe that there is any area that could use better, kindly share your suggestions. These will be much embraced and valued. Use the comment section below to provide suggestions or ask questions. Your questions will be swiftly investigated and properly addressed, and your comments will be promptly examined and published. Thanks. |


(flattened).png)

