In Microsoft Word documents, the space between the edge of the paper and the text is known as margin. Thus, you have left and right margins as well as top and bottom margins in a document.
In MS Word, you can set margins of your choice. When a new document is created, it starts with the default margins (generally 1” left & right as well as top and bottom margins). You can change this to some standard settings offered by MS Word or you may set custom margins as per your choice.
Some documents require text to be vertically aligned in a particular way. For instance, text in an invitation card is generally vertically centred between top and bottom margins. In MS Word, it is possible to align text with top margin or bottom margin or to centre it between margins.
In this tutorial, you will learn how to set margins and vertical alignment.
Task-1: Setting Margins
Download the practice document “Alice’s Adventures in the Wonderland” from About Tutorials page. Open this document and and do the following:
Setting “Narrow” Margins
Setting Custom Margins
Changing Margins of a Part of a Document
Task-2: Setting Vertical Alignment
Start a new document and choose landscpape orientation. Type the first and third lines of the following text in 36 font size, second, fourth and fifth lines in 28 font size and italicize the fifth line. Centre the text between left and right margins and also align it centrally between the top and bottom margins.
Step-by-step Instructions
Recap
In MS Word, you can set margins of your choice. When a new document is created, it starts with the default margins (generally 1” left & right as well as top and bottom margins). You can change this to some standard settings offered by MS Word or you may set custom margins as per your choice.
Some documents require text to be vertically aligned in a particular way. For instance, text in an invitation card is generally vertically centred between top and bottom margins. In MS Word, it is possible to align text with top margin or bottom margin or to centre it between margins.
In this tutorial, you will learn how to set margins and vertical alignment.
Task-1: Setting Margins
Download the practice document “Alice’s Adventures in the Wonderland” from About Tutorials page. Open this document and and do the following:
- Set the margins to “Narrow” setting offered by MS Word.
- Change the top margin to 0.75”, bottom margin to 0.75”, left margin to 1.5” and right margin to 1”.
- Change the margins of 3rd page onwards to “Wide” setting i.e. left and right margins = 2” and top and bottom margins = 1”.
 |
| Figure 1 |
- Click ‘Page layout’ tab on the Ribbon.
- Click the ‘Margins’ button in ‘Page Setup’ group (see Figure 1). The Margins gallery will open.
- Select the “Narrow” option. The margins will become 0.5” on all sides and MS Word will rearrange the text between the new margins.
Setting Custom Margins
- Click the ‘Margins’ button in ‘Page Setup’ group of ‘Page Layout’ tab.
- Select ‘Custom Margins’ from the Margins gallery. The ‘Page Setup’ dialog box will open (see Figure 2).
- In the ‘Margins’ section, fill 0.75” in the box labeled ‘Top’, 0.75” in the box labeled ‘Bottom’, 1.5” in the box labeled ‘Left’ and 1” in the box labeled ‘Right’. MS Word will show a live preview of the margin changes in the ‘Preview’ section of the dialog box.
- Click the ‘OK’ button and close the dialog box. The document margins will assume the values assigned.
 |
| Figure 2 |
- Move to page 3 of the document and place the cursor at the beginning of the first line.
- Click the ‘Page Setup’ dialog box launcher (see Figure 1). The ‘Page Setup’ dialog box will be launched (see Figure 2).
- Click the ‘Margins’ tab, if not already selected.
- Enter the desired margin values in the ‘Margins’ section i.e. top margin = 1”, bottom margin = 1”, left margin = 2”, right margin = 2”. You will see the live preview of margin change in the
- In the ‘Apply to’ box near the bottom of the dialog box, click the downpointing arrowhead. A drop down box will open showing two options – “Whole document” and “This point forward’.
- Choose the second option i.e. 'This point forward'. MS Word will apply the new margin settings to page 3 onwards.
- Scroll up and down the document to see the changed margin settings on pages 3 and 4. You will see that these are different from the original settings on pages 1 and 2.
Task-2: Setting Vertical Alignment
Start a new document and choose landscpape orientation. Type the first and third lines of the following text in 36 font size, second, fourth and fifth lines in 28 font size and italicize the fifth line. Centre the text between left and right margins and also align it centrally between the top and bottom margins.
Mrs Jaqueline Smith and Mr John Smith
cordially invite you to the wedding of
Robert Smith with Alberta Simon
on 6th March 2013
Venue: Hotel Hyatt Regency, New Delhi
Step-by-step Instructions

- Start a new document in MS Word.
- Click 'Page Layout' tab > 'Oreintation' > 'Landscape'.
- Type first and third lines of the given text in 36 font size and second, fourth and fifth lines in 28 font size.
- Select the fifth line. The Mini Toolbar will appear.
- Click the 'Italics' button on the Mini Toolbar. The fifth line will be italicised.
- Select the entire text. The Mini Toolbar will appear.
- Click the 'Centre' button on Mini Toolbar. The text will get centrally aligned between left and right margins.
- Click ‘Page Setup’ dialog box launcher. The ‘Page setup’ dialog box will be launched.
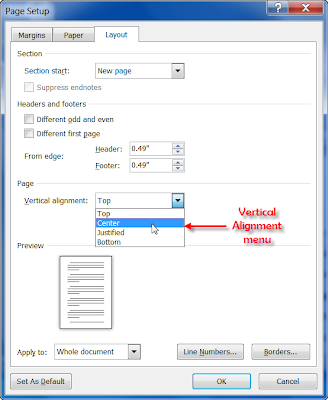
- Click the ‘Layout’ tab.
- In the ‘Page’ section, click the ‘Vertical Alignment’ box. A drop down menu will open showing four options – Top, Centre, Justified and Bottom (see Figure 3).
- Select ‘Centre’. MS Word will vertically align the text centrally between the top and bottom margins. The page will look like Figure 4.
 |
| Figure 4 |
Recap
- To set margins in a MS Word document, use the ‘Margins’ button in ‘Page Setup’ group of ‘Page Layout’ tab. Alternatively, launch the ‘Page Setup’ dialog box and enter the desired values in the Margins section of ‘Margins’ tab to set margins.
- Vertical alignment is set by selecting the desired option in the Vertical Alignment box on the ‘Layout’ tab of ‘Page Setup’ dialog box.
We appreciate you reading this guide in its entirety. Visit us again for news and useful advice in the future. It will be worthwhile for you to visit. I truly value your coming by and being here. If you find these instructions and advice useful and instructive, kindly tell your friends about our website. On the other hand, if you believe that there is any area that could use better, kindly share your suggestions. These will be much embraced and valued. Use the comment section below to provide suggestions or ask questions. Your questions will be swiftly investigated and properly addressed, and your comments will be promptly examined and published. Thanks.

(flattened).png "MS WORD 2010 INTERFACE")


