Microsoft Word 2007 provides a command for highlighting text. Manually, text is usually highlighted in yellow. MS Word goes a step beyond and offers several colour choices for highlighting text.
In this tutorial you will learn how to highlight text in a MS Word 2007 document.
Task
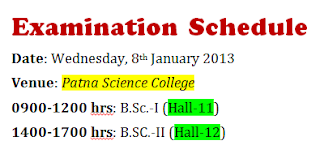
Open the practice document “Exam Schedule” that you created in the previous tutorial or download it from the About Tutorials Page. In this document, highlight the name of the venue “Patna Science College’ in yellow and “Hall-11” and “Hall-12” in green.
Step-by-Step Instructions
 Recap
Recap
To highlight text in a MS Word document, select text and click ‘Text Highlight Colour’ button on the Ribbon.
In this tutorial you will learn how to highlight text in a MS Word 2007 document.
Task
Open the practice document “Exam Schedule” that you created in the previous tutorial or download it from the About Tutorials Page. In this document, highlight the name of the venue “Patna Science College’ in yellow and “Hall-11” and “Hall-12” in green.
Step-by-Step Instructions
- Select “Patna Science College”.

Figure 1 - Click the ‘Home’ tab on Ribbon. The ‘Text Highlight Colour’ button in the Font group (see Figure 1) is used for highlighting text. When MS Word 2007 starts, this button offers yellow highlight, which is the default colour for highlighting text. Notice that there is a thick yellow line on the button, indicating that yellow highlight colour is active.
- Click the ‘Text Highlight Colour’ button. The selected text will be highlighted in yellow.
- Select “Hall-11” and click on the little down pointing arrow-head by the side of the ‘Text Highlight Colour’ button. A drop down palette of 15 colours will open (see Figure 2).
- Hover the mouse pointer over one of the little squares of colour in the palette. MS Word shows a live preview of text highlight in the colour of the square. As you move the pointer over different colours, the highlight colour of selected text will change accordingly.
- Click the green colour and the selected text will be highlighted in green and the drop-down palette will disappear. Notice that the ‘Text Highlight Colour’ button has turned green. As stated earlier, this button displays yellow colour when MS Word starts, but once you use any other colour from the drop-down palette, that colour becomes current and clicking this button will apply the new colour to highlight selected text.
- Select “Hall-12” and click the ‘Text Highlight Colour’ button which is currently displaying green colour. The selected text will be highlighted in green.
- Select “Hall-12” once again and click the ‘Text Highlight Colour’ button again. The highlight disappears. This button actually works as a toggle command for applying and removing highlight.
- Select “Hall-12” again and click the button again to bring back the green highlight. After you have made changes to the font, font size and font colour in the Fonts tutorial and applied the text highlight in this lesson, the text in your document ‘Exam Schedule’ will look like this:

 |
| Figure 2 |

To highlight text in a MS Word document, select text and click ‘Text Highlight Colour’ button on the Ribbon.
We appreciate you reading this guide in its entirety. Visit us again for news and useful advice in the future. It will be worthwhile for you to visit. I truly value your coming by and being here. If you find these instructions and advice useful and instructive, kindly tell your friends about our website. On the other hand, if you believe that there is any area that could use better, kindly share your suggestions. These will be much embraced and valued. Use the comment section below to provide suggestions or ask questions. Your questions will be swiftly investigated and properly addressed, and your comments will be promptly examined and published. Thanks.

(flattened).png "MS WORD 2010 INTERFACE")


