DIY PROJECT 1 - A1 MS WORD TUTORIALS FLYER - INSTRUCTIONS
Initial Settings- Start a new MS Word document.
- Click ‘Page layout’ tab > ‘Size’ > ‘A4’.
- Click ‘Margins’ > ‘Narrow’.
- If the page orientation of your document is Landscape, click ‘Orientation’ > ‘Portrait’.
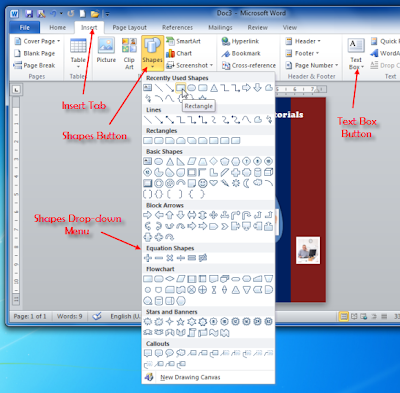 |
| Figure 1: Insert Tab and Shapes Drop-down Menu |
Inserting Rectangles- There are four vertical rectangles in the flyer – two blue ones and two red ones. We will use the ‘Shapes’ feature of MS Word to make these rectangles.
- Click ‘Insert’ tab > ‘Shapes’ button in ‘Illustrations’ group. A drop-down gallery of shapes will appear (see Figure 1).
- Select the rectangle from the ‘Recently Used Shapes’ section or the ‘Rectangles’ section. The drop-down gallery will disappear. When you move the mouse pointer to the text area it will assume ‘+’ shape.
- Press the left mouse button and while keeping it pressed, drag the mouse pointer diagonally to make a small rectangle. You will notice that next to the ‘View’ tab on the Ribbon, a new tab has appeared. This is the ‘Drawing Tools Format’ tab of MS Word (see Figure 2).
- Click on the rectangle and press ‘Ctrl’+C keys to copy it.
- Press ‘Ctrl’+V keys thrice to make 3 copies of the rectangle (see Figure 3).
- Click and drag the rectangles to separate them from each other (see Figure 4).
 |
| Figure 2: Drawing Tools Format Tab |
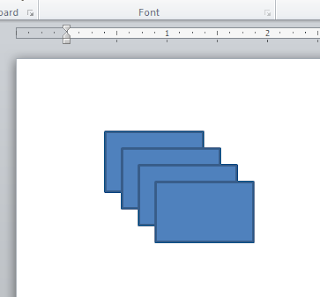 |
| Figure 3 |
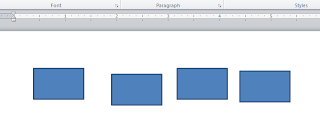 |
| Figure 4 |
Positioning Rectangles- Click the first rectangle.
- Click the ‘Format’ tab.
- Click the ‘Position’ button in ‘Arrange’ group. A drop-down menu will open.
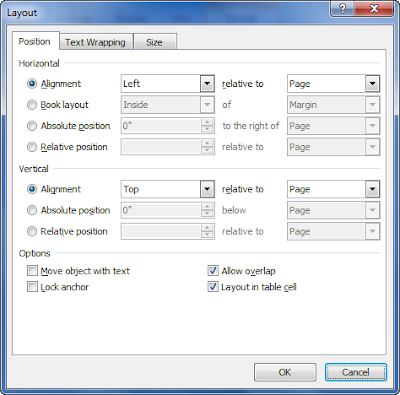
- Choose ‘More layout Options’ appearing right at the bottom of the menu (see Figure 5). The ‘Layout’ dialog box will open (see Figure 6).
- In the ‘Horizontal’ section, choose ‘Left’ from the drop-down menu of ‘Alignment’ box and ‘Page’ from the drop-down menu of ‘Relative to’ box.
- In the ‘Vertical’ section, choose ‘Top’ from the drop-down menu of ‘Alignment’ box and ‘Page’ from the drop-down menu of ‘Relative to’ box.
- Click ‘OK’ button to close the dialog box. MS Word will align the rectangle with the top and left edges of the page.
- Click on the second rectangle.
- If the ‘Format’ tab is not selected, click on it.
- Click the ‘Position’ button in ‘Arrange’ group and choose ‘More layout Options’ appearing right at the bottom of the menu. The ‘Layout’ dialog box will open.
- In the ‘Horizontal’ section, enter “2.08” (“52.5” in case of metric units) in the ‘Absolute Position’ box and ‘Page’ from the drop-down menu of ‘to the right of’ box.
- In the ‘Vertical’ section, choose ‘Top’ from the drop-down menu of ‘Alignment’ box and ‘Page’ from the drop-down menu of ‘Relative to’ box.
- Click ‘OK’ button to close the dialog box. MS Word will align the second rectangle with the top of the page at a distance of 2.08” from the left edge of the page.
- Repeat steps 8 to 13 for third and fourth rectangles, entering the values “4.16” and “6.24” (“105” and “157.5” in case of metric units) in the ‘Absolute Position’ box respectively, and retaining all the other settings of steps 11-13. After you finish, you will find that the third and fourth rectangles have been aligned with the top edge of the page at distances of 4.16” and 6.24” from the left edge of the page.
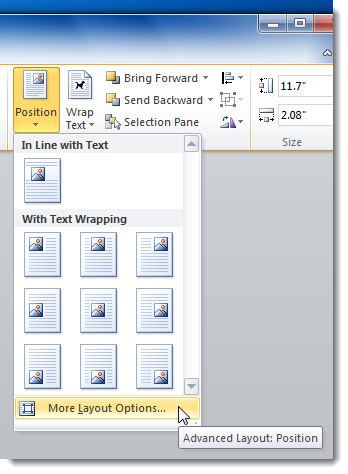 |
| Figure 5: Position Drop-down Menu |
 |
| Figure 6: Layout Dialog Box |
Formatting Rectangles- Press the ‘Shift’ key and while keeping it pressed, click each of the four rectangles successively. You will see that all rectangles are selected.
- Click the ‘Format’ tab if it is not selected.
- In the ‘Size’ group of this tab, enter “11.7” in the ‘Shape Height’ box and “2.08” in the ‘Shape Width’ box. If you are using the metric measurement units in your document, these values will be “297” and “52.5”. The rectangles will expand to the sizes specified.
- In the ‘Shape Styles’ group, click the ‘Shape Outline’ button and from the drop-down menu, select ‘No outline’. The outline of the rectangle will diappear.
- Click anywhere above the page and below the Ruler. The rectangles will get deselected.
- Press Shift key and click on first and third rectangles.
- Click ‘Format’ tab > ‘Shape Fill’ button of ‘Shape Styles’ group. A drop-down colour palette will open.
- Select the dark blue colour from the palette. First and third rectangle will turn dark blue.
- Similarly, select second and fourth rectangles and colour them dark red.
Inserting Flyer Title- Click ‘Insert’ tab > ‘Text Box’ button in the ‘Text’ group. A drop-down menu of Text Box styles will open.
- Click on ‘Simple Text Box’. A text box will appear on the page.
- Click inside the text box and type “A1 MS Word Tutorial”.
- Press the Enter key and type “1wordtut.com”.
- Select the first line and right click. The Mini Toolbar of MS Word will appear (see Figure 7).
- From the Mini Toolbar, select font “Cooper Black” and font size “36”. You will see that the top line text is spread out on two lines
- Click the middle handle on the right side of the text box and drag it right until the top line text is on one line.
- Select the second line and choose font “Magneto” and font size “24” on the Mini Toolbar.
- Select the entire text and click the ‘Centre’ button on the Mini Toolbar. The text will get centred in the text box.
- Click the ‘Font Color’ button and select white colour.
- Since the background of the text box is also white, the text will disappear, but rest assured, it is still there.
- Click the ‘Drawing Tools Format tab’ > ‘Shape Outline’ button and select ‘No Outline’. The text box outline will disappear.
- Click the ‘Shape Fill’ button and select ‘No Fill”. MS Word will make the text box background transparent and the white text will become visible against the blue and red colour of the rectangles underneath. The Flyer title is now done.
 |
| Figure 7: Mini Toolbar |
Inserting Text on Vertical Panels- Click ‘Insert’ tab > ‘Text Box’ button in the ‘Text’ group > ‘Simple Text Box’. A text box will appear on the page above the flyer title.
- Place the mouse pointer near the top edge of the text box when it will change into ‘+’ shape with arrow heads (see Figure 8).
- Click and drag the text box and drop it in the middle of the first Blue rectangle such that some space is left between the left side of text box and the left edge of the page.
- Grab the middle handle on the right side of the text box and drag it to the left until equal amount of space is left between the right side of the text box and right side of the blue rectangle.
- Click inside the text box and type “Become”.
- Press Enter key and type “EXPERT”.
- Press Enter key and type “in Word”.
- Select the entire text in the text box and right click. The Mini Toolbar of MS Word will appear.
- From the Mini Toolbar, select font “Comic sans” and font size “20”.
- Click ‘Bold’ and ‘Centre’ buttons on the Mini Toolbar. The text will become bold and get centred in the text box.
- Click the ‘Font Color’ button and select yellow colour.
- Click the ‘Shape Outline’ button and select ‘No Outline’. The text box outline will disappear.
- Click the ‘Shape Fill’ button and select ‘No Fill”. MS Word will make the text box background transparent and the yellow text will become visible against the blue colour of the rectangle.
- Following the method explained in steps 1-13, do the text boxes for the second and fourth (red) rectangles as well as the text box at the bottom.
 |
| Figure 8: Mouse Pointer on the Text Box Outline |
Inserting & Formatting the Oval- Click ‘Insert’ tab > ‘Shapes’ in the ‘Illustrations’ group.
- From the dropdown menu, select the oval shape.
- Click the page, press the left mouse button and keeping it pressed, drag the mouse pointer diagonally to draw the oval shape.
- In the ‘Shape Height’ box in the ‘Size’ group, enter “5.5” (140 for metric units) and “2.5” in the ‘Shape Width’ box (65 for metric units). The oval will expand in size.
- Click ‘Position’ button > ‘More layout Options’. The ‘Layout’ dialog box will open.
- Click the ‘Position’ tab if it is not already selected.
- In the ‘Horizontal’ section, choose ‘Centred’ from the ‘Alignment’ drop-down menu and ‘Page’ from the ‘Relative to’ drop-down menu.
- In the ‘Vertical’ section, choose ‘Centred’ from the ‘Alignment’ drop-down menu and ‘Page’ from the ‘Relative to’ drop-down menu.
- Click the ‘OK” button to close the dialog box. MS Word will centre the oval horizontally between the left and right sides of the page and also centre it vertically between the top and bottom of the page.
- Click the ‘Format’ tab > ‘Shape Effects’ > ‘Shadow’.
- From the shadow gallery, choose a shadow style from the ‘Outer’ group. The oval will now have a shadow effect.
- Place the mouse pointer over the tiny green circle above the oval. The pointer will turn into a circular arrow (see Figure 9).
- Click and drag the pointer to your left to rotate the oval leftwards. Now your oval is done.
 |
| Figure 9: Mouse Pointer at the green circle above the Oval |
Inserting Pictures- Download the images for the flyer following the links in the DIY-1 post of 3rd January 2013.
- Insert a simple text box.
- Drag it to the fourth rectangle and position it at the appropriate place in the lower half of the rectangle.
- Click ‘Insert’ tab > ‘Picture’. The ‘Insert Picture’ dialog box will open.
- Navigate to the directory where you have downloaded the images and select image “DIY-1-Image-4”. The image will be inserted in the text box. You will also notice that the ‘Picture Tools Format’ tab of MS Word has appeared after the ‘View’ tab (see Figure 10).
- Click the picture in the text box and then click ‘Format’ tab > ‘Simple Frame, white’ in the ‘Picture Styles’ group. A frame will appear around the image.
- Click the ‘Picture Effects’ button > ‘Shadow’ and choose an option from the ‘Outer’ section. The picture will now have shadow effect.
- Click on the text box containing the image. ‘Drawing Tools Format’ tab will appear
- Click ‘Format’ tab > ‘Shape Fill’ > ‘No Fill’ The text box will become transparent.
- Click ‘Shape Outline’ > ‘No Outline’ The text box outline will disappear.
- Following the method outlined in steps above, insert the middle picture (“DIY-1-Image-2”), format it and place it at the centre of the oval.
- Next insert the picture “DIY-1-Image-1” in a text box, format the picture and place it above the middle picture such that its lower corner overlaps the middle picture.
- Click the text box containing” DIY-1-Image-1” and the ‘Drawing Tools Format’ tab will appear.
- Click ‘Drawing Tools Format’ tab > ‘Send Backward’ button in the ‘Arrange’ group. The text box containing “DIY-1-Image-1” will go behind the text box of the middle picture.
- Finally, insert the picture “DIY-1-Image-3”, format it and place it below the middle picture.
- One by one, select each text box, and choose ‘No Fill’ option from the ‘Shape Fill’ drop-down menu and ‘No Outline’ from the ‘Shape Outline’ menu.
- The text boxes will disappear and the pictures will be seen as shown in the DIY Project 1 post.
- The Flyer is now fully done (see Figure 11).
 |
| Figure 10: Picture Tools Format tab |
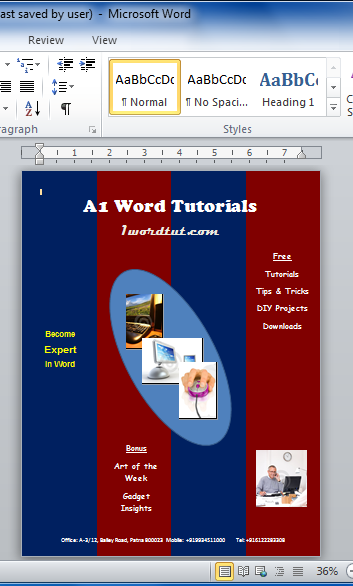 |
| Figure 11: Finished Flyer |
We appreciate you reading this guide in its entirety. Visit us again for news and useful advice in the future. It will be worthwhile for you to visit. I truly value your coming by and being here. If you find these instructions and advice useful and instructive, kindly tell your friends about our website. On the other hand, if you believe that there is any area that could use better, kindly share your suggestions. These will be much embraced and valued. Use the comment section below to provide suggestions or ask questions. Your questions will be swiftly investigated and properly addressed, and your comments will be promptly examined and published. Thanks.


(flattened).png "MS WORD 2010 INTERFACE")


